A Step-by-Step Guide to Zero-Downtime Deployment with AWS ECS, Jenkins, and GitLab
Welcome to my guide on deploying a Flask application using AWS ECS with zero downtime. This guide will walk you through the steps of setting up a CI/CD pipeline using GitLab and Jenkins, configuring AWS services, and achieving a seamless deployment process.
You’ll learn how to create and manage AWS resources, automate your build and deployment tasks with Jenkins, and leverage the power of AWS ECS to ensure your application is always available and scalable.
List of Content
- Create a Jenkins Server on an EC2 Instance
- Test Deployment of Application to EC2
- Upload the Docker Image to ECR
- Deploy to ECS with an Application Load Balancer
- Automate Re-deployment with Jenkins Pipeline
- Shut down and Delete (optional)
Prerequisites
- A GitLab account
- An Amazon Web Services account
- An installation of an IDE or text editor.
NOTE: Utilizing AWS resources as carried out in this tutorial WILL incur costs. Please note AWS documentation for up-to-date pricing in your selected region. The cost at the time I performed this tutorial in my region was less than 5 USD.
Step 0: Clone GitLab project (optional)
Go to https://gitlab.com/miottiph/flask-app-aws-deployment.git and clone the project if you like or use your own project for this guide.
Step 1: Create a Jenkins Server on an EC2 instance
The first step is setting up a Jenkins server on an EC2 instance, acting as the cornerstone of our CI/CD pipeline. Here’s how to start:
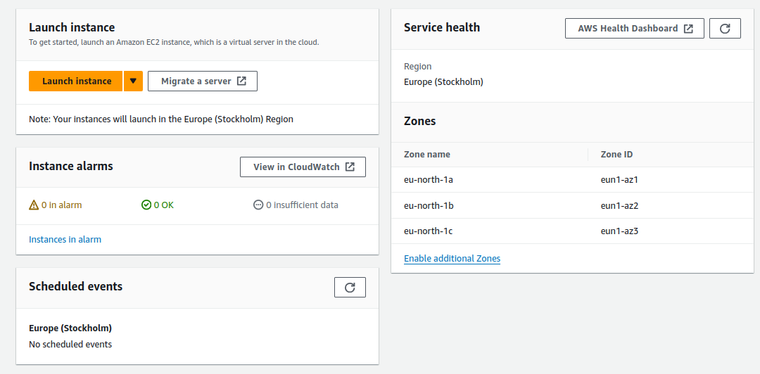
Launch EC2 Instance
- Navigate to Amazon EC2 Dashboard: Log in to your AWS account and use the search bar to find the EC2 service.
-
Launch a new instance: Remember the region in which your instance will be launched. Each region has zones attached where your instance is available.
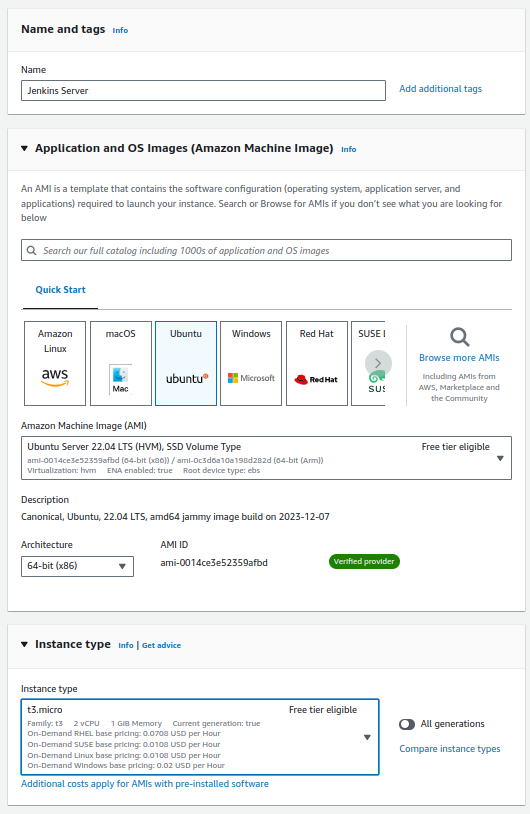
- Application and OS Images:
- Name your instance: Choose a descriptive name for easier identification.
- Select an AMI: Opt for a free tier AMI, like Ubuntu, especially if you’re mindful of costs. My choice of Ubuntu stems from familiarity, but choose what’s best for you.
- Instance type: Select according to your needs. The free tier offers sufficient resources for initial setups.
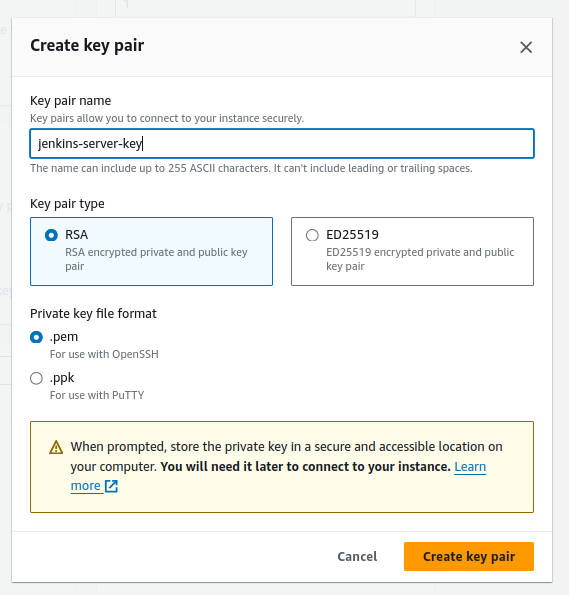
-
Key pair creation: This step is crucial for secure access. Create and download a new key pair, safeguarding the key file for future use.
-
Network settings: Create a new security group. This is your instance’s virtual firewall. Initially, allow only SSH traffic from your IP address. This allows you to access Jenkins only through an SSH client.
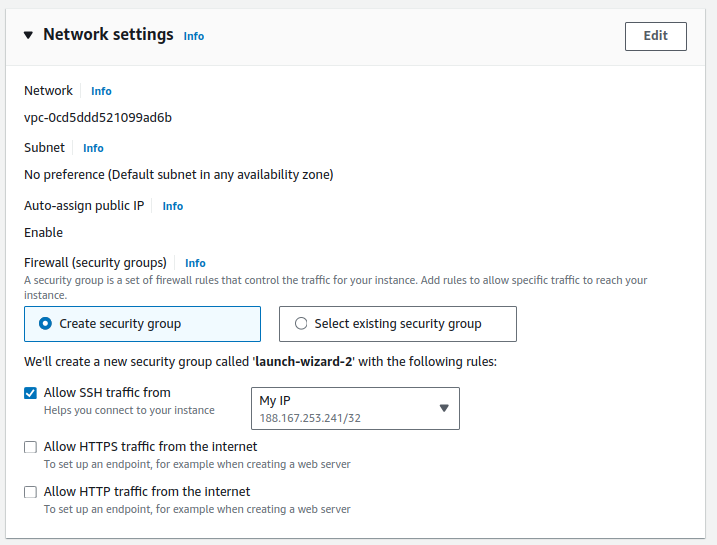
-
Launch: With configurations set, launch your instance.

Install Jenkins
-
SSH into your EC2 instance: Follow the steps in the image below to connect to your newly created instance.
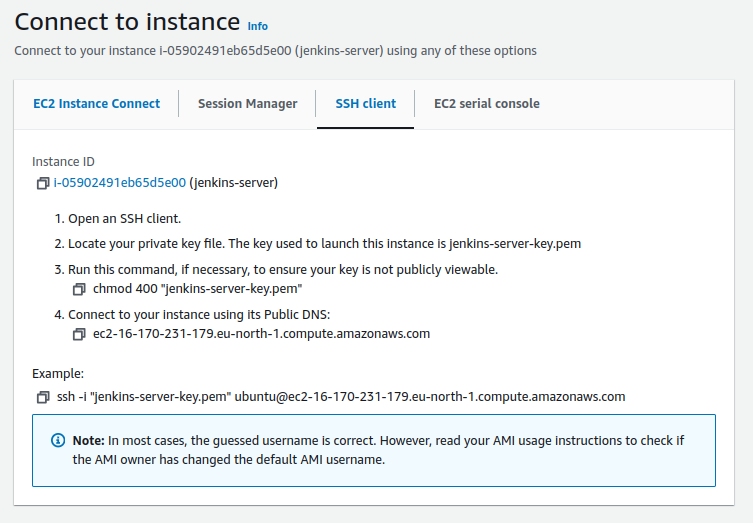
Next, we have to install Jenkins on our newly created Ubuntu instance. Follow the instructions on the official documentation (a prerequisite for Jenkins is Java the installation of which you can find on the same link. Also, choose LTS release for Jenkins). Once Jenkins is installed let’s test it if it is running correctly.
- Jenkins installation: Navigate to the official Jenkins documentation for a step-by-step guide. Remember, Java is a prerequisite, so tick that off your list first. Choose the LTS release of Jenkins.
- Starting Jenkins:
- Enable Jenkins to start on boot using
sudo systemctl enable jenkins. - Start Jenkins with sudo
systemctl start jenkins. - Verify Jenkins is up and running with
sudo systemctl status jenkins. If everything has been set up correctly, you should see an output like this:
- Enable Jenkins to start on boot using
Loaded: loaded (/lib/systemd/system/jenkins.service; enabled; vendor preset: enabled)
Active: active (running) since Tue 2018-11-13 16:19:01 +03; 4min 57s ago
First Login to Jenkins
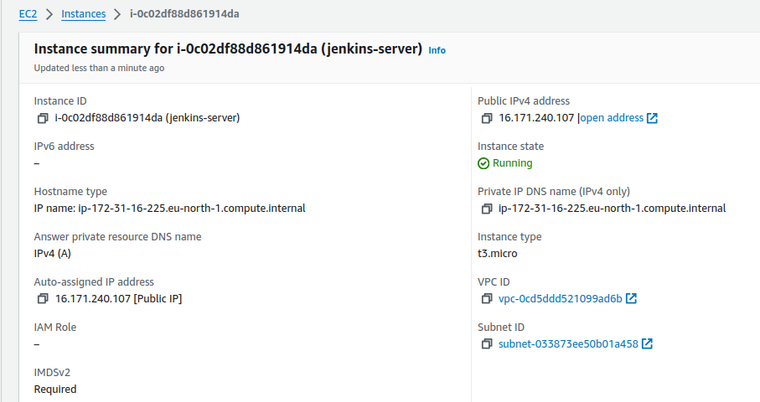
Next, we log in to Jenkins and create an account. You can find the instructions for the setup also at the end of the official Jenkins installation documentation. Open your browser and pass the public IP address of your EC2 instance and port number where Jenkins is listening, i.e., http://[your-ec2-instance-public-ip]:8080 (search for the instance IP address on the instance summary page). Try it out, but it won’t work.
To access the Jenkins server, we have to change the inbound rules of the security group applying to your EC2 instance. During the instance definition, we allowed SSH connection from the localhost’s IP address. This was necessary to prevent access to the instance over the internet. Now that we know on which port number Jenkins is listening, i.e., 8080, we will create a custom TCP access to the Jenkins server from the localhost’s IP address only.
- Adjust security group rules: Modify your EC2 instance’s security group to allow access on port 8080, Jenkins’ default port.
- On the left panel of your EC2 dashboard navigate under Network & Security to Security Groups and select the group you have associated with your EC2 instance (if you don’t remember which group it was you can find the name of it under the instance summary page).
- Edit Inbound rules and add a custom TCP rule with an 8080 port range listening to your localhost’s IP address.
- Check that your security group has an outbound rule allowing all outbound traffic to any destination.
- Access Jenkins: Type
http://[your-ec2-instance-public-ip]:8080into your browser. -
Unlock Jenkins: Retrieve the initial admin password from your server (in the machine’s terminal where Jenkins is running Type
sudo cat /var/lib/jenkins/secrets/initialAdminPassword) and unlock Jenkins.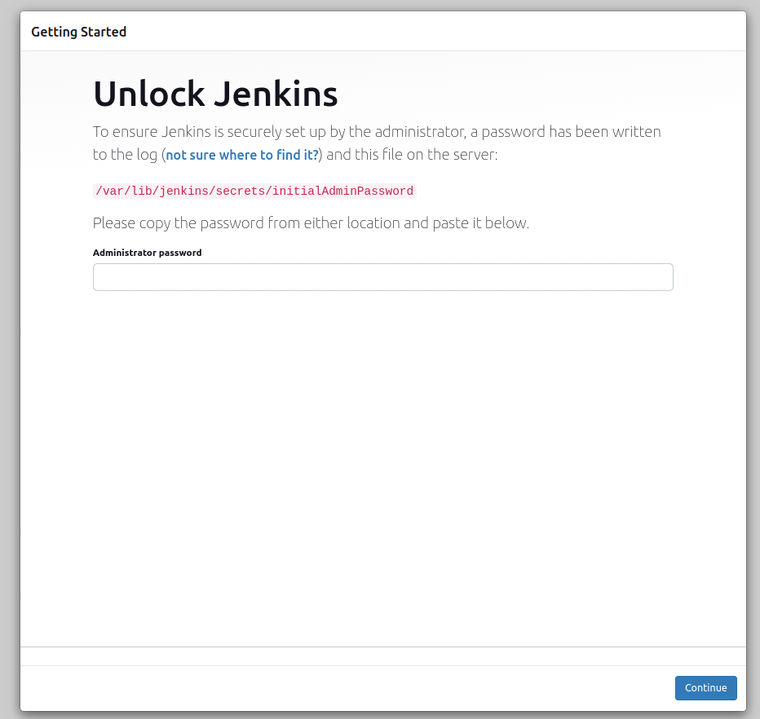
- Install suggested plugins: Proceed with installing the suggested plugins. Later we will install additional plugins necessary for our Jenkins pipeline.
- Create an admin user: Secure your Jenkins dashboard with an admin account. You will use this user to log into Jenkins anytime. Accept the Jenkins URL and finish the setup. Accept the Jenkins URL and finish the setup.
Viola! You should now see the home dashboard of Jenkins.
Step 2: Test Deployment of Application to EC2
In this step, we are going to deploy our application to the EC2 instance where Jenkins is running. With this step, we set a connection between our SCM tool GitLab and Jenkins as well as test if we are correctly building the Docker image for our application.
Integrating Jenkins with GitLab – Authenticating Jenkins in GitLab
To begin, we need to ensure Jenkins can communicate securely with GitLab. This involves setting up authentication to interact with the GitLab API, primarily for sending build statuses back to GitLab. The detailed steps can be found in GitLab’s official documentation. This authentication is not used for cloning git repos
- Create a project access token in GitLab: Opt for a token with the Maintainer role for sufficient permissions, although your specific requirements might dictate otherwise.
- Configure Jenkins with the token: Armed with the token, we proceed to configure our Jenkins server.
Create and Configure Jenkins Project
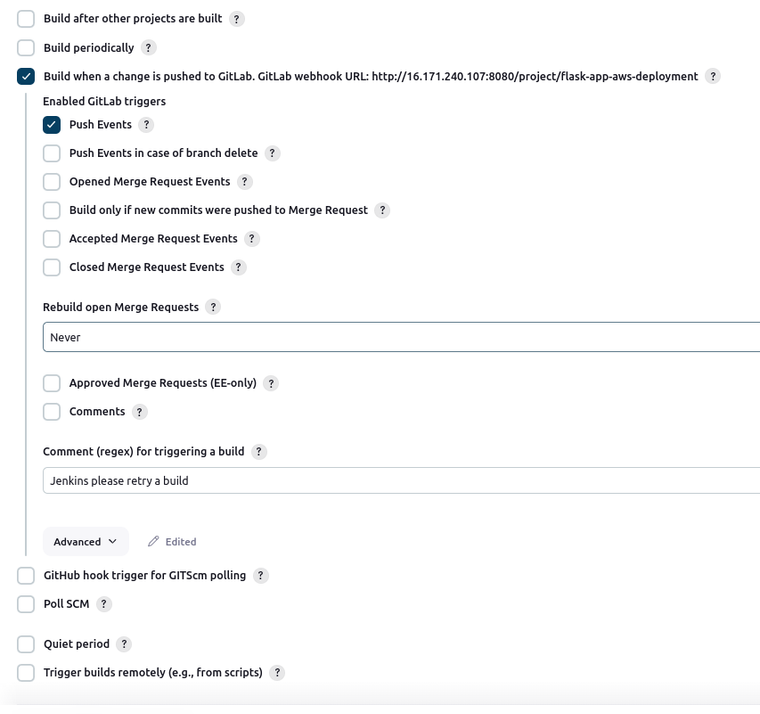
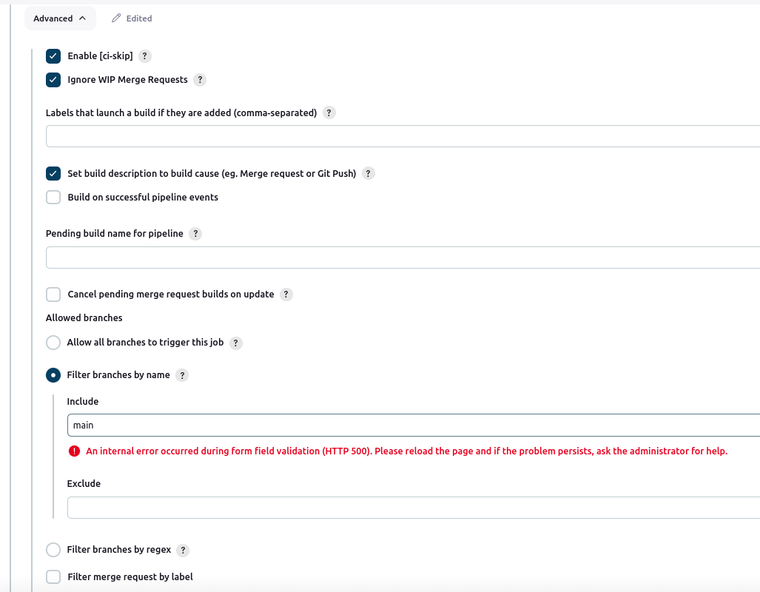
Next, we have to configure the Jenkins project and define its rules where we want to run our pipeline. Select a Pipeline. In this type of Jenkins item, you can also very easily paste your pipeline from the Jenkinsfile of your repository in the project configurations without the necessity to commit and push each change in GitLab. Following the instructions on GitLab’s official page your pipeline configurations should be like in the following images (I have set build triggers only for push events to the main branch as this is the production branch for a Flask app in most cases):

Enabling GitLab to Trigger Jenkins Builds – Authenticating GitLab in Jenkins
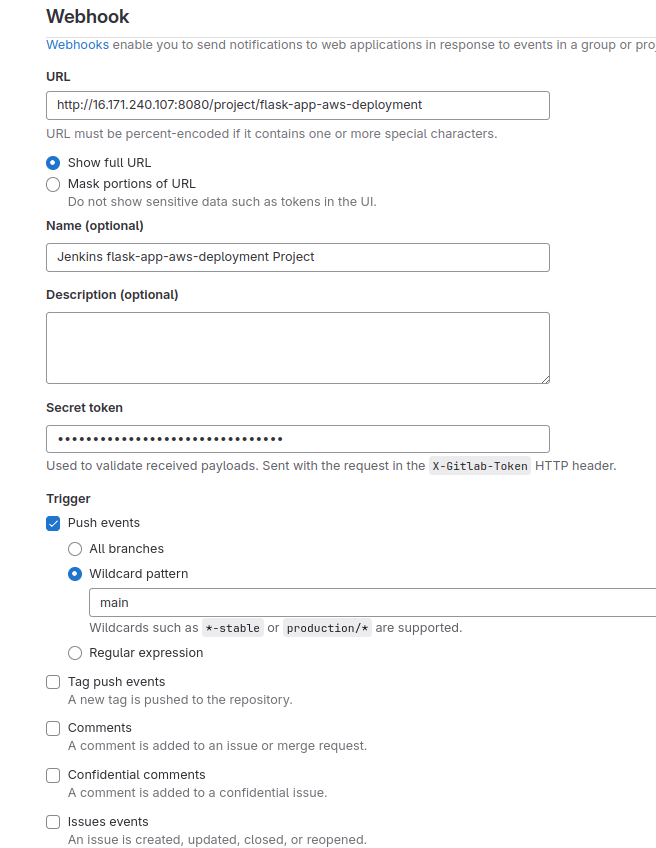
- Setting up a webhook: This connection, now from GitLab to Jenkins, ensures that only authorized entities can initiate builds. Follow the guide to create a webhook in GitLab at the project level.
Your advanced build settings should be similar to the following image if you want to deploy from your main branch:
The settings for the webhook should look like this (for the trigger URL paste the URL that you see under the Build when a change is pushed to GitLab checkbox like in the previous image):
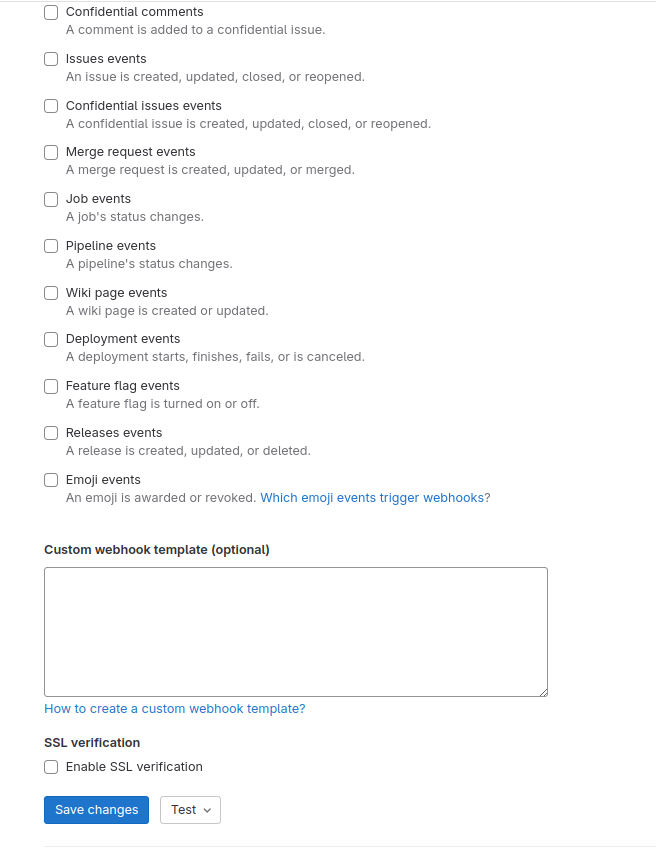
When testing the webhook connection, choose test types that correspond to the triggers you have selected. Go ahead and try out your tests.
Troubleshooting connection issues:
- TCP connection error: Encountering this error actually signals correct progress up to this point. The resolution involves adjusting inbound rules to allow GitLab’s requests to reach Jenkins.
- Configuring security group inbound rules: Research and apply the IP range for GitLab’s domain (or your custom domain) within your EC2 instance’s security group settings.
- Token authentication error: Should you face token-related issues, revisit your Jenkins pipeline and webhook configurations, ensuring tokens are accurately set and saved.
Success indicators:
- Upon testing your webhook, aim for an HTTP 200 response, marking a successful handshake between GitLab and Jenkins.
- Even without defined stages, a successful setup will reflect a pipeline has run status in Jenkins, setting the stage for real deployments.
Fetching Code from GitLab to Jenkins
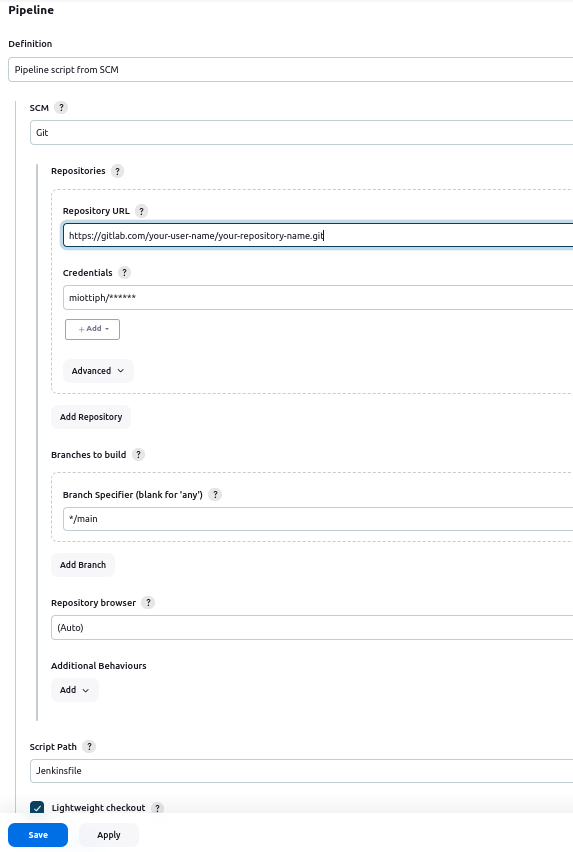
After establishing the foundational setup of your Jenkins server, the next pivotal step is to ensure Jenkins can fetch your application code from GitLab and execute your pipeline, which includes fetching code, building a Docker image, and running tests. This guide walks you through triggering your Jenkins pipeline in two distinct ways, either using the script editor at the bottom of the pipeline configuration or loading a Jenkinsfile from GitLab. For the latter option, you need to configure your pipeline to run the script from an SCM tool as I did in the image below.
If you want to use the UI Jenkins offers, then input the following pipeline script, hit Save, and click the Build Now button in the right panel to run the pipeline.
pipeline {
    agent any
    environment {
        appRepository = 'flask-app'  // Name of your Docker image repository
    }
    stages {
        // omit this stage if you use the pipeline script from SCM
        stage('Fetch code') {
            steps {
                git branch: 'main',
                credentialsId: "gitlab-user-id",
                url: 'https://gitlab.com/your-user-name/your-repository-name.git'
            }
        }
        stage('Build Docker Image') {
            steps {
                script {
                    dockerImage = docker.build(appRepository + ":$BUILD_NUMBER", ".")
                }
            }
        }
        stage('Test') {
            steps {
                script {
                    dockerImage.inside {sh "python -m unittest"}
                }
            }
        }
    }
}
Most probably you got an error. I mentioned at the beginning of this section that the Jenkins-to-GitLab authentication serves only for sending the build status in Jenkins to GitLab. We also need to grant Jenkins permission to fetch our GitLab repository. Here is how to do it with HTTPS (it is also possible to use SSH with a small twist in setting the credential type in step 6)
- Navigate to Jenkins dashboard: Go to the main page of your Jenkins instance.
- Manage Jenkins: Click on Manage Jenkins from the side menu.
- Manage credentials: Look for the Manage Credentials link and click on it. You might find it directly on the Manage Jenkins page or under the Security section.
- Select the store: You will see a list of credentials Stores. Typically, you’ll select (global) to add credentials that can be used by any job in Jenkins. Click on Domains -> Global credentials (unrestricted).
- Add credentials: Click on the Add Credentials.
- Choose the credential type:
- For Git repositories that require username and password (like HTTPS GitLab URLs), select Username with password.
- Fill in the Username and Password fields with your GitLab credentials.
- Optionally, you can provide a description to help identify the purpose of these credentials later.
- ID field: Jenkins will automatically generate an ID for these credentials, but you can also specify your own. This ID is what you’ll use in your
Jenkinsfileas thecredentialsId. - Save: Click the OK or Save button to store the credentials.
After this configuration is done the first stage should work now. However, for the subsequent stages to work, we need to do a couple more things.
Install and Configure the Docker Engine
Next, we need to install Docker on the host where Jenkins is running. For that open the terminal and connect to your EC2 instance. Follow the installation guide on https://docs.docker.com/engine/install/ubuntu/ for installing the Docker Engine. When you try out the sudo docker run hello-world command it won’t work, because we haven’t added the Jenkins user to the Docker group. To do this execute:
sudo usermod -aG docker jenkins
Note: You might need to restart the Jenkins service or the entire server for this change to take effect:
sudo systemctl restart jenkins
Now try to run the hello-world image. We are almost done with building testing and deploying to EC2. We have to install another plugin to run Docker commands from the Jenkins pipeline:
- Navigate to Jenkins dashboard: Go to the main page of your Jenkins instance.
- Manage Jenkins: Click on Manage Jenkins from the side menu.
- Plugins: Look for the Plugins link and click on it.
- Available Plugins: In the Available Plugins tab search for Docker Pipeline and install it.
We also need to approve script execution in a Pipeline by Docker, because we run a shell script inside Docker when running tests. For that do the following:
- Navigate to manage Jenkins: From your Jenkins dashboard, go to Manage Jenkins.
- Access script approval: Look for and click on In-process Script Approval.
- Approve scripts: In this section, you’ll find a list of script signatures that Jenkins has blocked. Find the signature mentioned in your error message and click Approve. This will allow your pipeline to execute the Docker-related method.
Build the pipeline again and you should see all stages turn green.
Deploy Flask App to EC2
With these preparations, we are ready to deploy the application on the same EC2 instance where Jenkins is running. Back in the Configuration section of your project paste the following pipeline into the Pipeline configuration section of your Jenkins project.
pipeline {
    agent any
    environment {
        appRepository = 'flask-app'  // Name of your Docker image repository
        containerName = 'flask-app-container' // Name of the Docker container for your Flask app
        portMapping = '8000:8000' // Adjust the port mapping as necessary
    }
    stages {
        // omit this stage if you use the pipeline script from SCM
        stage('Fetch code') {
            steps {
                git branch: 'main',
                credentialsId: "gitlab-user-id",
                url: 'https://gitlab.com/your-user-name/your-repository-name.git'
            }
        }
        stage('Build Docker Image') {
            steps {
                script {
                    dockerImage = docker.build(appRepository + ":$BUILD_NUMBER", ".")
                }
            }
        }
        stage('Test') {
            steps {
                script {
                    dockerImage.inside {sh "python -m unittest"}
                }
            }
        }
        stage('Deploy to EC2') {
            steps {
                script {
                    // Stop the currently running container
                    sh "docker stop ${containerName} || true"
                    sh "docker rm ${containerName} || true"

                    // Start a new container with the updated image
                    sh "docker run -d --name ${containerName} -p ${portMapping}
                      ${appRepository}:${BUILD_NUMBER}"
                }
            }
        }
    }
}
Don’t forget to customize the fields credentialsID, you-user-name, and your-repository-name in the Fetch code stage. You should be able to run your pipeline successfully. It will:
- Fetch your Flask app’s code from GitLab.
- Build a Docker image from your Flask app.
- Run unit tests inside the built Docker image.
- Stop and remove previous running containers with the same name as defined in the pipeline, and run a new container mapping your application with your EC2 host as defined in
portMapping.
In your browser, you can now access the deployed application by opening under the 8000 port of you instance’s IP address. You should see Hello World written on the rendered webpage.
Step 3: Upload the Docker Image to ECR
With Jenkins and GitLab now configured, and the image correctly building and running, it’s time to take your CI/CD pipeline to the next level by incorporating Docker image management. This step focuses on uploading your Docker image to Amazon Elastic Container Registry (ECR), a fully managed Docker container registry that makes it easy for developers to store, manage, and deploy Docker container images.
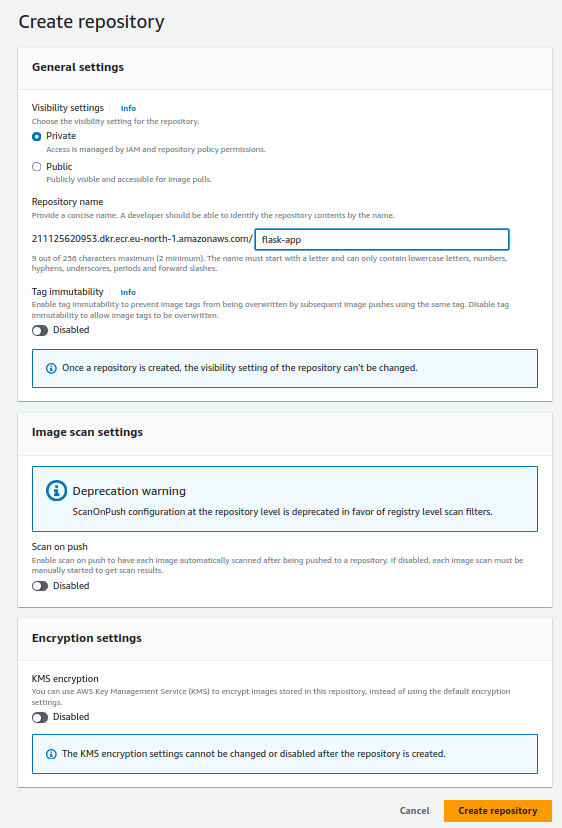
Create an ECR repository
Go to the Amazon ECR service, create a repository with the same name (see appRepository variable) you used in the pipeline in the previous section, and click Create repository. You need to set up an image repository for each image that you publish. Give the repository the same name you want the image to have.
Configure Jenkins with AWS Access
Now, we need to configure Jenkins to interact with ECR. This involves IAM user creation and permission management.
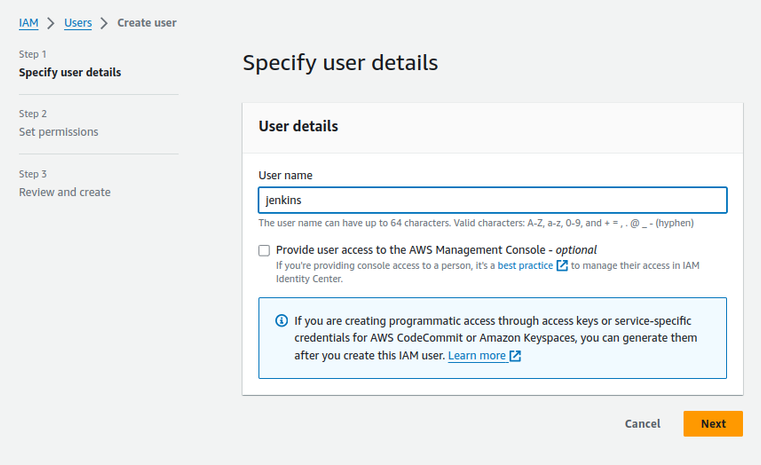
-
Craft an AWS user for Jenkins: Open the IAM management section within AWS and create a new user dedicated to Jenkins operations. This user will give your pipeline the ability to communicate with AWS services. However, a better practice is to set up roles in AWS for Jenkins to access AWS services like ECR.
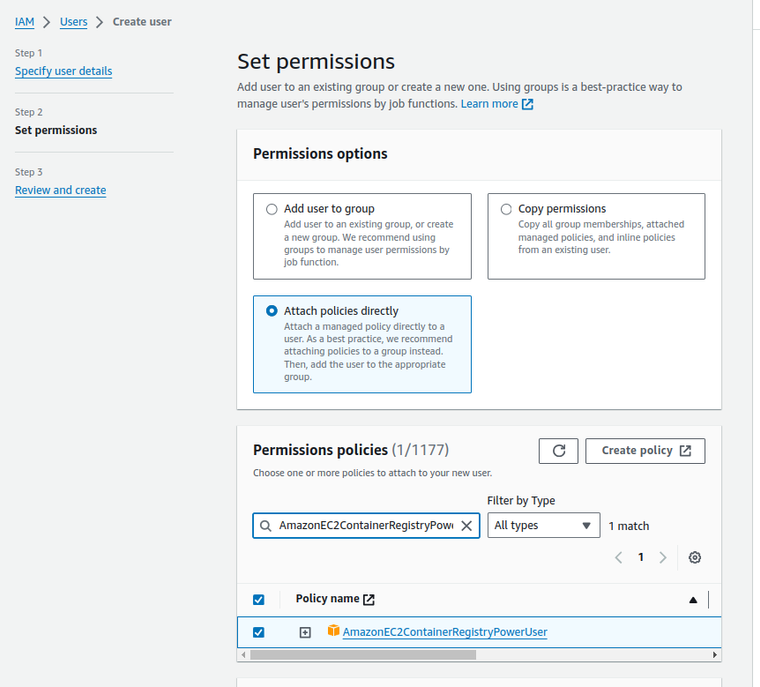
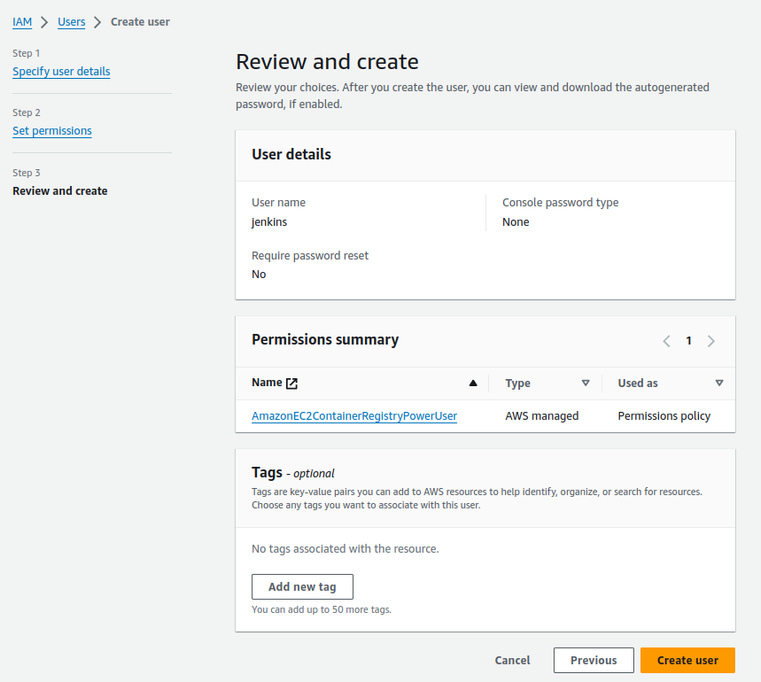
-
Attach the right permissions: Attach the AmazonEC2ContainerRegistryPowerUser policy to this user.
-
Create access key: Under the Security Credentials tab of the created user, generate a new access key. Opt for Third-party service as the use case and label it wisely, such as jenkins-to-ecr-access. Securely store the provided access key.
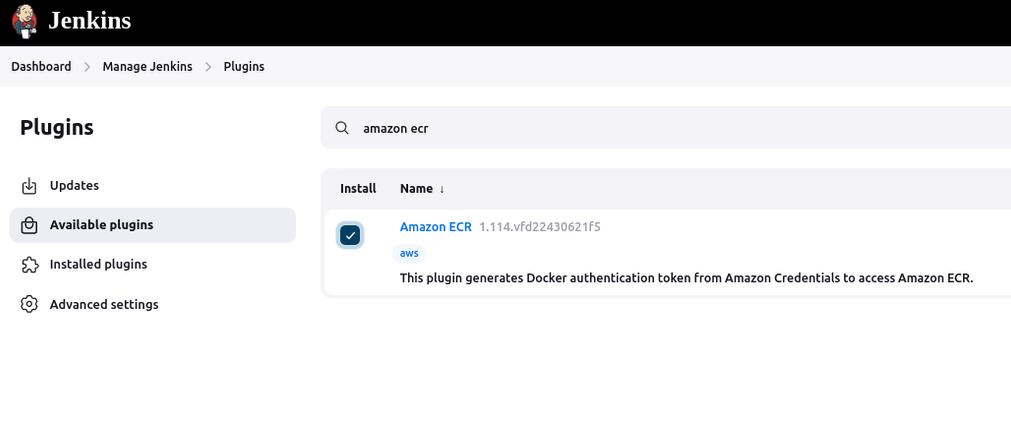
Configure AWS Credentials in Jenkins
Next, we need to create a connection between the Jenkins server and ECR. For this, we install the Amazon ECR Plugin. It integrates Jenkins with Amazon ECR for image pushing and pulling. While not strictly necessary if using the Docker Pipeline Plugin for authentication (as it can handle docker login commands), this plugin can simplify the process of logging into ECR. Also, verify that you have the AWS Credentials Plugin installed.
To register the user in Jenkins follow these steps:
- Navigate to Jenkins Dashboard > Manage Jenkins > Manage Credentials.
- Under the (global) domain (or within the specific domain you wish to use), click Add Credentials.
- Choose AWS Credentials from the Kind drop-down.
- Enter your Access Key ID and Secret Access Key for an IAM user with permission to access ECR.
- In the ID field, enter a memorable ID for these credentials (e.g.,
awsID). This is what you’ll use in theregistryCredentialvariable in your Jenkinsfile.
And voila, that’s all! All we will need is the URI to be able to pull the image where we want to create a container from it.
Test Pipeline
To push the image to ECR we will slightly modify the Jenkinsfile we have used previously. We remove the Deployment to EC2 stage and the corresponding environment variables. Following the Test stage we add a stage to push the image to ECR with the tools of the Amazon ECR Plugin. The pipeline of Step 3 of this guide looks now as follows:
pipeline {
    agent any
    environment {
        appRepository = 'flask-app'  // Name of your Docker image repository
        awsID = 'awsID'  // AWS ID
        awsRegion = 'eu-north-1'  // AWS region
        registryCredential = "ecr:$awsRegion:$awsID"  // Authentication to ECR registry
        ecrRegistry = "your-aws-account-id.dkr.ecr.your-region.amazonaws.com" // registry URL
    }
    stages {
        // omit this stage if you use the pipeline script from SCM
        stage('Fetch code') {
            steps {
                git branch: 'main',
                credentialsId: "gitlab-user-id",
                url: 'https://gitlab.com/your-user-name/your-repository-name.git'
            }
        }
        stage('Build Docker Image') {
            steps {
                script {
                    dockerImage = docker.build(appRepository + ":$BUILD_NUMBER", ".")
                }
            }
        }
        stage('Test') {
            steps {
                script {
                    dockerImage.inside {sh "python -m unittest"}
                }
            }
        }
        stage('Upload Docker Image') {
            steps {
                script {
                    docker.withRegistry('https://' + ecrRegistry, registryCredential) {
                        dockerImage.push("$BUILD_NUMBER")
                        dockerImage.push("latest")
                    }
                }
            }
        }
        stage('Cleanup Docker Images') {
            steps {
                script {
                    sh "docker rmi ${appRepository}:${env.BUILD_NUMBER}"
                    sh "docker rmi ${ecrRegistry}/${appRepository}:${env.BUILD_NUMBER}"
                    sh "docker rmi ${ecrRegistry}/${appRepository}:latest"
                }
            }
        }
    }
}
Fill in the missing registryCredential and ecrRegistry values in your Jenkinsfile. Ensure that your-aws-account-id is replaced with your actual AWS account ID and your-region with the AWS region your ECR repository is hosted in (e.g., us-east-1).
Now that your Jenkinsfile is configured with the correct credentials and registry information you should be able to run your pipeline successfully. It will:
- Fetch your Flask app’s code from GitLab.
- Build a Docker image from your Flask app.
- Run unit tests inside the built Docker image.
- Log in to AWS ECR using the credentials you provided.
- Push the built Docker image to your ECR repository tagged with the build number and as
latest. - Remove all locally (on Jenkins server) created images.
After your pipeline has run successfully you should see in your created ECR repository the pushed images of your application.
Step 4: Deploy to ECS with an Application Load Balancer
In this step, we will together deploy the containerized application to an ECS cluster in AWS. This is a fully managed container orchestration service as opposed to a self-managed system like Kubernetes. With a managed system you don’t need to focus on building a production environment where your application is hosted. With your prepared container in your ECR, you can easily create tasks and services to run your application from containers.
However, depending on your deployment strategy the URL address at which your service can be accessed from the Internet changes after each deployment. This is true if we do rolling or blue-green deployments. In order to access the service at a fixed URL we create an Application Load Balancer (ALB) in AWS that has a fixed DNS under which we can reach our service from the Internet. The role of the ALB is then to elastically and automatically distribute incoming traffic across multiple targets. In our case, the targets are the changing containers after re-deployment of our Flask application.
The ALB serves as a single point of contact for clients sending requests for the services. The attached Listeners check then for connection requests and route them based on defined rules to the corresponding Targe group.
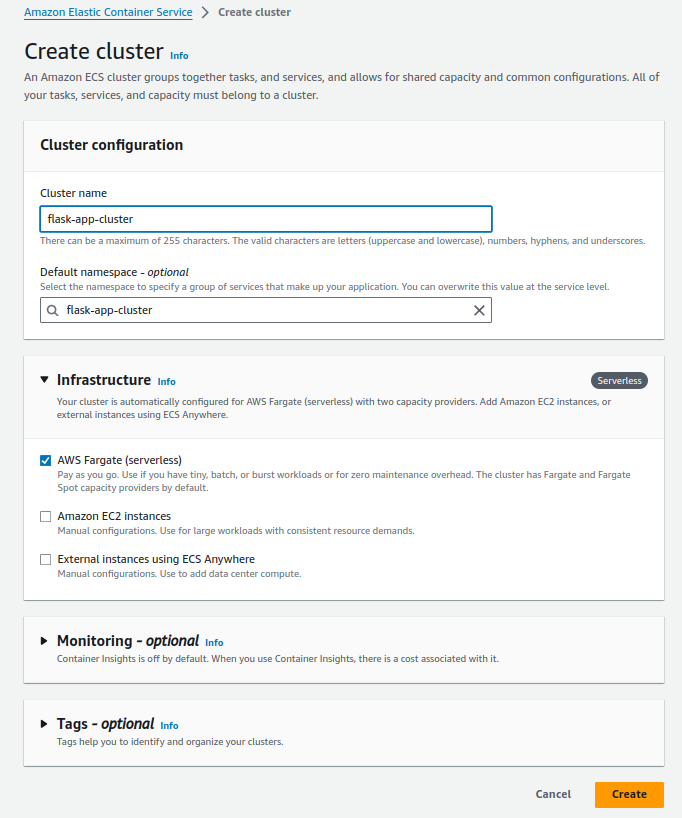
Create Cluster in ECS
- Use the search bar to search for ECS.
- Select Elastic Container Service.
- Click Get Started.
- Click Create cluster.
- Assign a name to the cluster - I chose
my-cluster. - Ensure AWS Fargate is selected under the Infrastructure options.
- All other fields can be left with default options.
- Click Create. Move to the next step after the cluster is successfully created.
Create a Task Definition
This is where you define the blueprint of your application’s deployment, including the Docker image to use, CPU and memory requirements, and more. Creating a Task Definition is akin to outlining your application’s needs and how it should live in the ECS ecosystem.
- Go to the Amazon ECS console.
- In the navigation pane, choose Task Definitions.
- Click the Create new task definition button.
-
Enter a Task definition family name, such as
flask-webserver.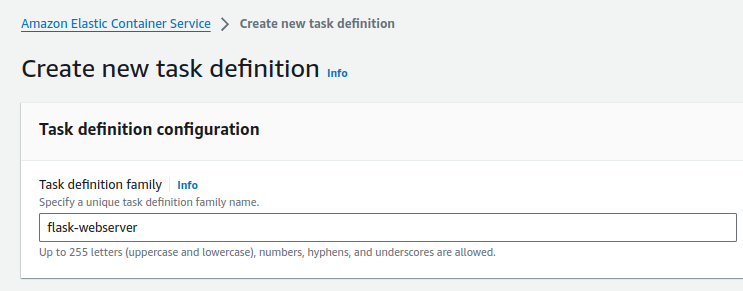
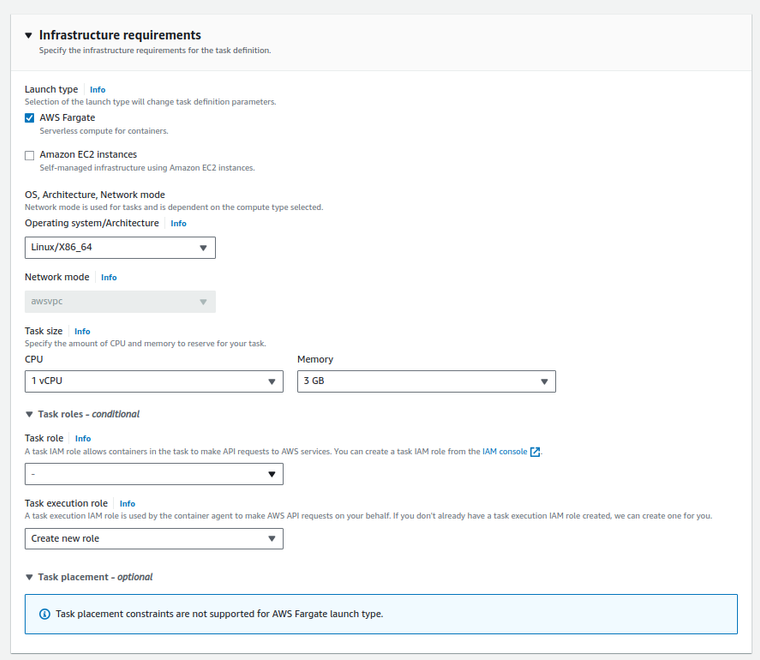
- Select Fargate under Launch type. This option allows you to run containers without managing servers or clusters.
- Leave the Task role and Task execution role (create new role) to their default settings or set them according to your specific needs. If your task requires special permissions to interact with AWS services, specify the appropriate task role.
- For Operating system/Architecture, choose
Linux/X86_64. - Select the appropriate network mode. For Fargate tasks,
awsvpcis the mode that provides each task with its own elastic network interface. -
Specify the task size, including the amount of CPU and Memory the task should use. For instance, you might select 1 vCPU and 3GB of memory, but adjust based on the needs of your application.
- Click on the Add container button.
- Provide a Container name, like
flask-app. - For the Image URI, input the ECR repository URI followed by the image tag. It will look something like
<aws-account-id>.dkr.ecr.<region>.amazonaws.com/<ecr_repo_name>:<tag>. -
Under Port mappings, set the Container port to
8000and selectTCPas the protocol. This should match the port your Flask application is listening on.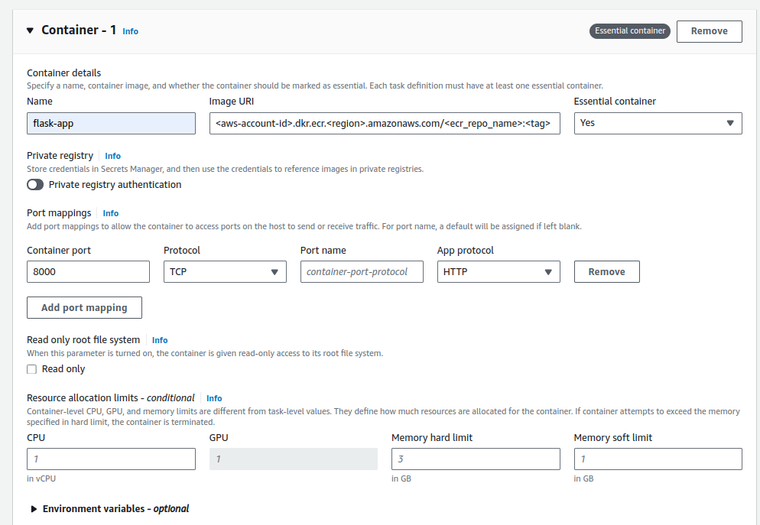
Create Target Group
Before the load balancer can direct traffic to your application, it needs to know where to send it. Creating a Target Group involves specifying the port and protocol for incoming traffic, effectively guiding requests to the correct destination within your cluster.
- Access your EC2 dashboard and look for Target Groups under the Load Balancing section.
- Click the Create target group button to initiate the process.
- For Target type, choose IP addresses if you are running tasks on Fargate or if you need flexibility with IP-based targeting.
-
Input a Target group name, such as
flask-webservice-tg, which should be identifiable and potentially mirror your service’s name.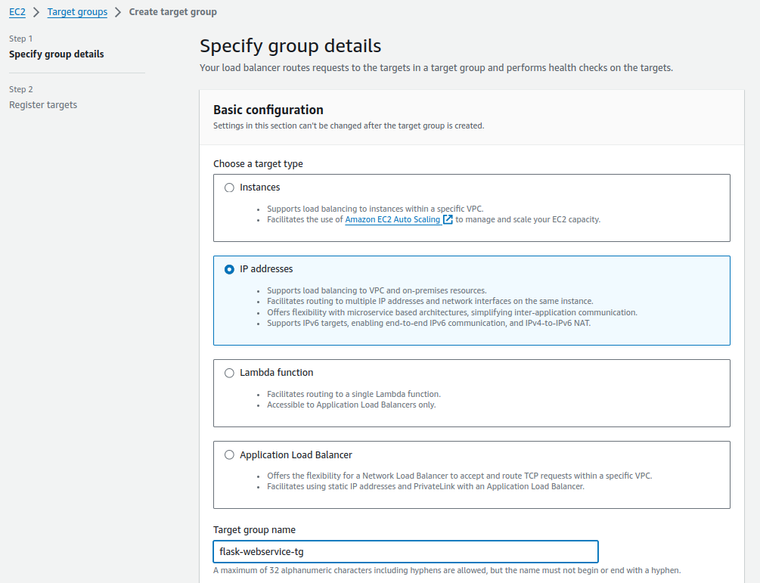
- Ensure the correct protocol and port are set. For a Flask app, you will likely be using
HTTPand port8000. - Specify the VPC that matches the network configuration for your ECS service.
-
Choose the IP address type; typically, this will be
IPv4.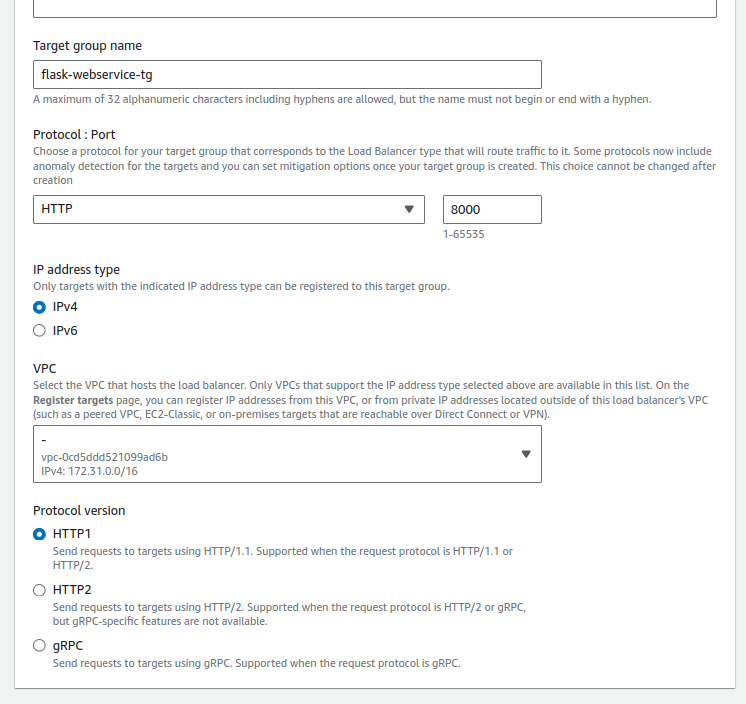
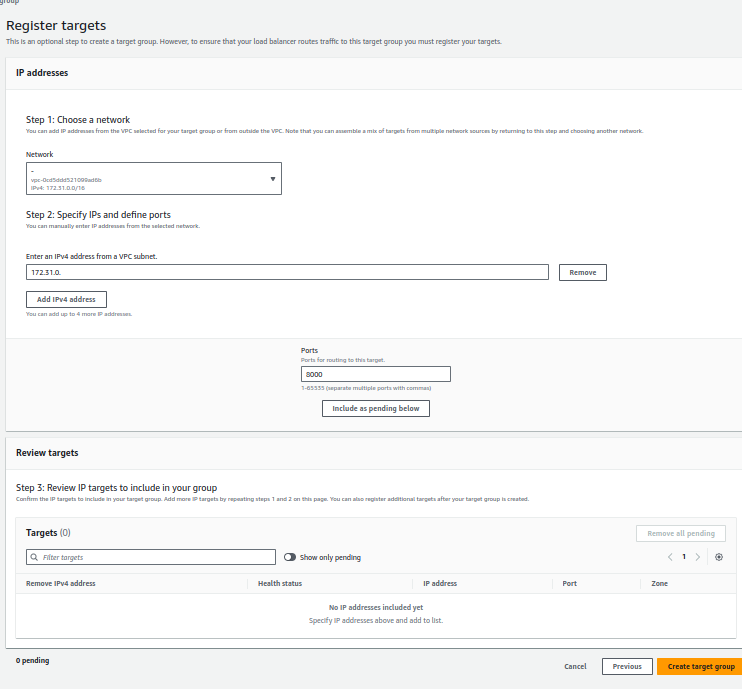
- On the Register Targets page, you can manually enter IP addresses for your targets or leave this blank to be populated dynamically by your ECS service when it launches tasks.
- Set the Ports that the Load Balancer will use to route to these targets; it should match the port used by your service.
- After specifying IPs and ports, review your target group settings.
-
Confirm everything is correct and click Create target group.
Define Security Groups for ECS Service and Application Load Balancer (ALB)
Security is paramount, and this step involves defining the rules that allow traffic to flow to both your ECS Service and ALB securely. These Security Groups act as virtual firewalls, ensuring only authorized traffic can access your application.
Creating a Security Group for the ALB
- In the AWS Management Console, locate and click on the EC2 service to open the EC2 Dashboard.
- From the left navigation pane, click on Security Groups, then choose Create securitygroup.
- Define Basic Details:
- Security group name: Enter a meaningful name like
flask-webservice-alb. - Description: Add a brief description, such as Allow accessing the ALB.
- VPC: Select the VPC associated with your load balancer and ECS service.
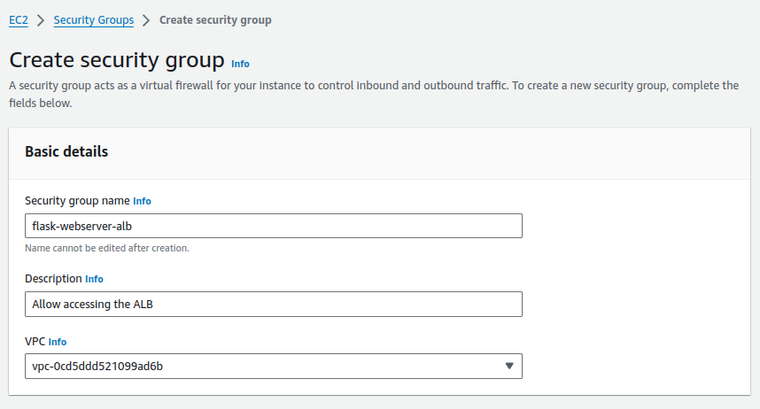
- Security group name: Enter a meaningful name like
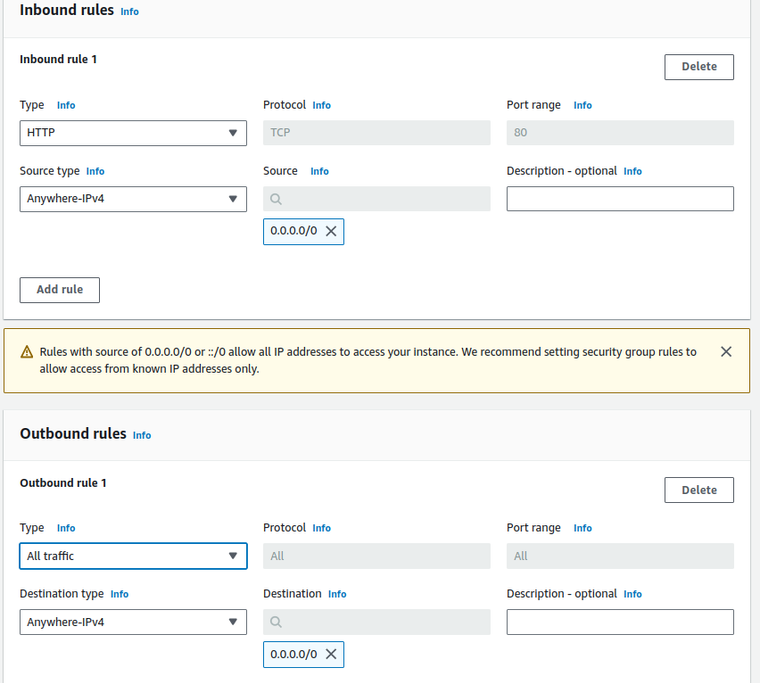
- Configure Inbound Rules:
- Click on Add Rule to define the types of traffic allowed. For a web service, you would typically allow:
- Type: HTTP
- Protocol: TCP
- Port range: 80
- Source: Custom, and input
0.0.0.0/0for access from any IP (adjust as necessary for your security needs).
- Configure Outbound Rules:
- Type: Usually set to All traffic for the widest access. However, restrict as necessary based on your application’s needs.
- Destination:
0.0.0.0/0to allow all outbound traffic (modify according to your outbound traffic requirements).
-
Review your settings and then click Create.
Creating a Security Group for the ECS Service
- Repeat the steps to access Security Groups in the EC2 Dashboard and click Create security group.
- Define Basic Details:
- Security group name: Provide a unique name like
flask-webservice-ecs-service. - Description: Add description, such as Allows accessing the ECS service from ALB.
- VPC: Select the same VPC as your ALB.
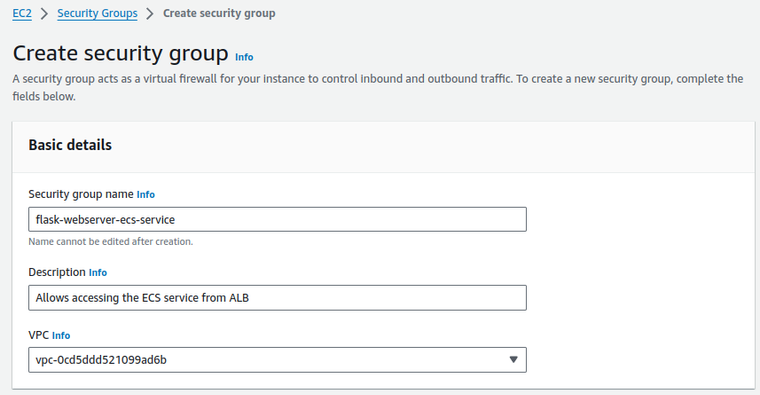
- Security group name: Provide a unique name like
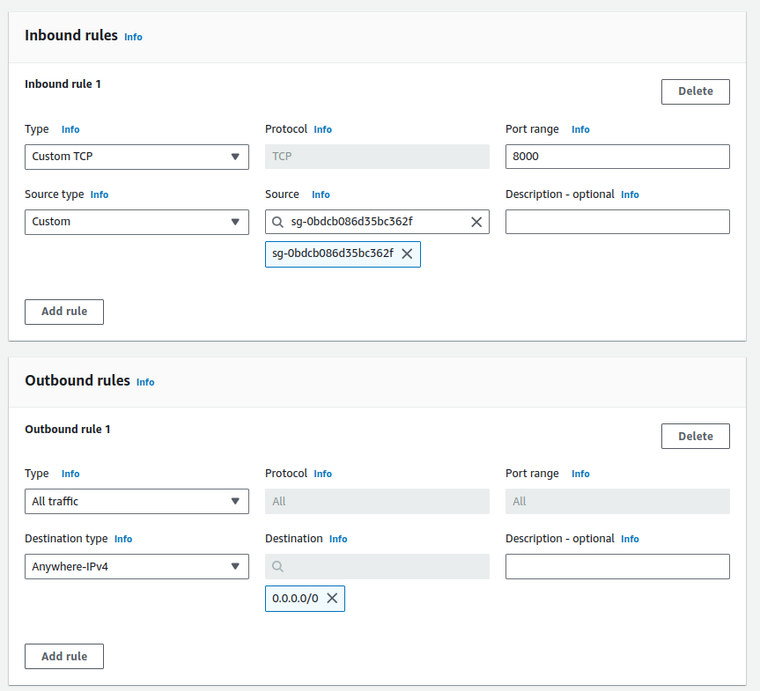
- Configure Inbound Rules:
- Click on Add Rule and set up rules to allow traffic from your ALB:
- Type: Custom TCP
- Protocol: TCP
- Port range: 8000 (or the specific port your ECS service is listening on).
- Source: Select the security group of your ALB to restrict access only to traffic coming from the ALB.
- Configure Outbound Rules:
- Type: Typically, all outbound traffic is allowed by default, but you can restrict this if necessary.
-
After reviewing your configurations, click the Create button.
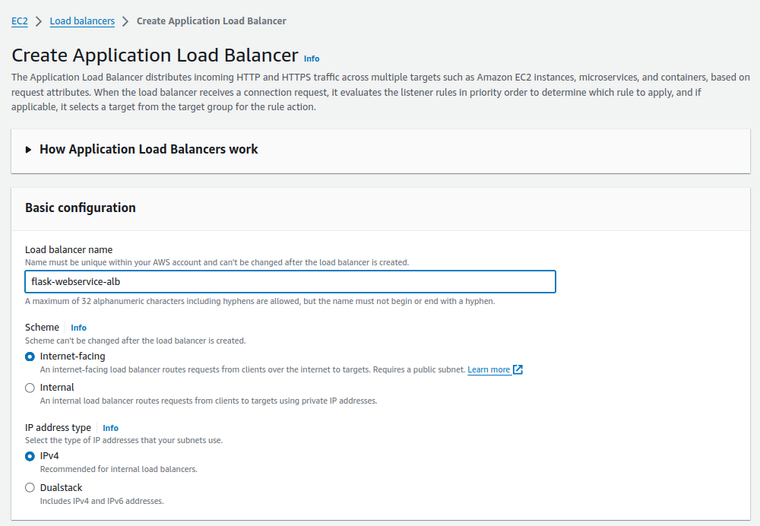
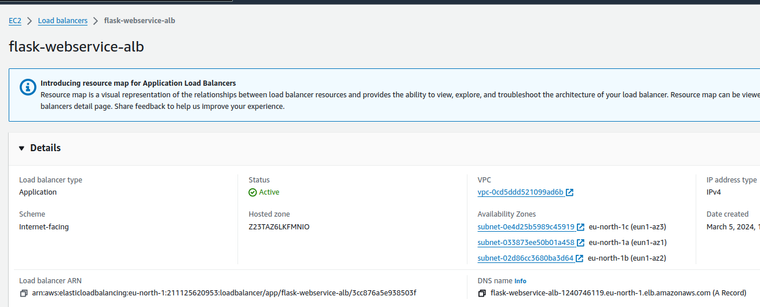
Create the Application Load Balancer
An Application Load Balancer (ALB) acts as the traffic cop for your application, ensuring requests are evenly distributed across your tasks. Setting up an ALB involves specifying listeners and routing rules, which are crucial for managing how external users access your application.
- Open the EC2 dashboard and go to the Load Balancers section.
- Select Create Load Balancer and choose Application Load Balancer.
- For Load balancer name enter a distinctive name like
flask-webservice-alb. - Choose an Internet-facing schema to allow the ALB to receive requests from the Internet.
-
For IP address type ensure IPv4 is selected.
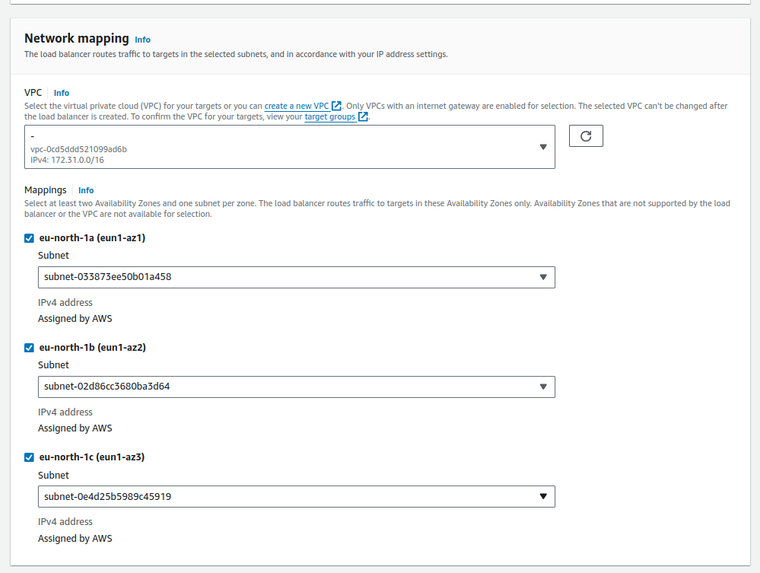
- Choose the VPC that matches your application’s network configuration.
-
Select at least two availability zones and corresponding subnets to ensure high availability. The ALB will route traffic to the selected zones.
- Assign a security group that allows appropriate inbound traffic to your ALB. Choose the security group we have created previously for the ALB.
- Set up a listener that checks for incoming connections using the appropriate protocol (HTTP) and port (80 by default).
-
Default action: Forward to the previously created target group (
flask-webservice-tg).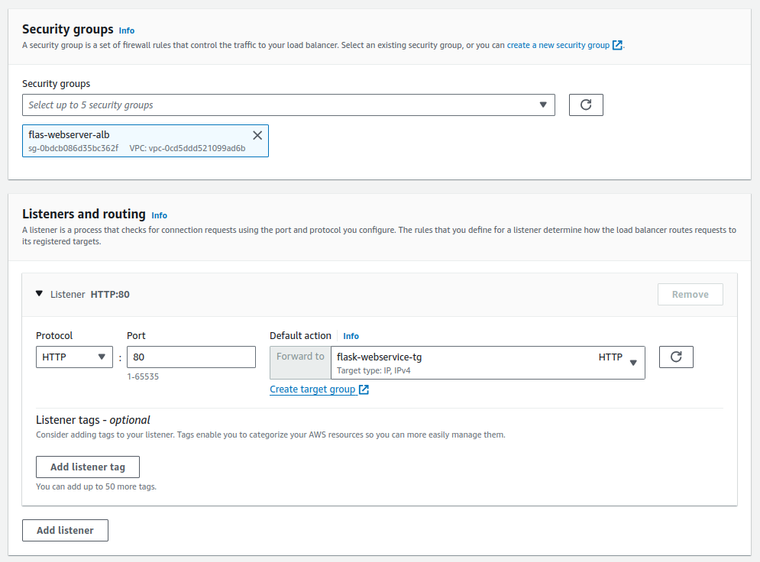
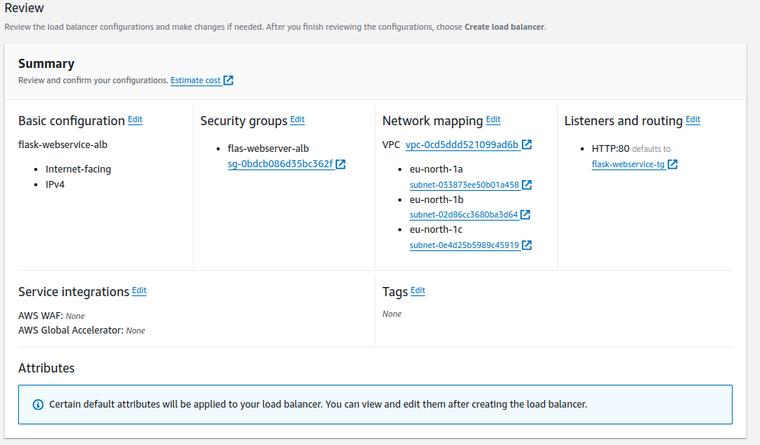
- Review all the configurations to ensure they are correct.
-
After reviewing the configurations, click Create Load Balancer.
Create a Service
This final step brings your application to the forefront, allowing it to serve users. Creating a Service in ECS ties together your Task Definition, Cluster, and ALB. It’s where you specify the desired number of tasks, ensuring your application can scale and handle the load as needed.
Follow these steps to create your ECS Service:
- Navigate to your cluster: Go to the Amazon ECS dashboard, find the cluster you created earlier, and click on the name to access it.
- Click on the Create Service button.
- Set compute configurations:
- Under the Capacity provider strategy, you can choose either EC2 or FARGATE depending on whether you want to manage your servers (EC2) or want AWS to manage them for you (FARGATE).
- For a serverless setup where AWS manages the underlying infrastructure, select FARGATE.

- Define your service:
- Under Task Definition, select the family and revision of the task definition you created for your Flask application.
- Enter a service name, for instance,
flask-web-service. - Specify the number of desired tasks you want to run. This number can be scaled up or down later depending on your application’s load.
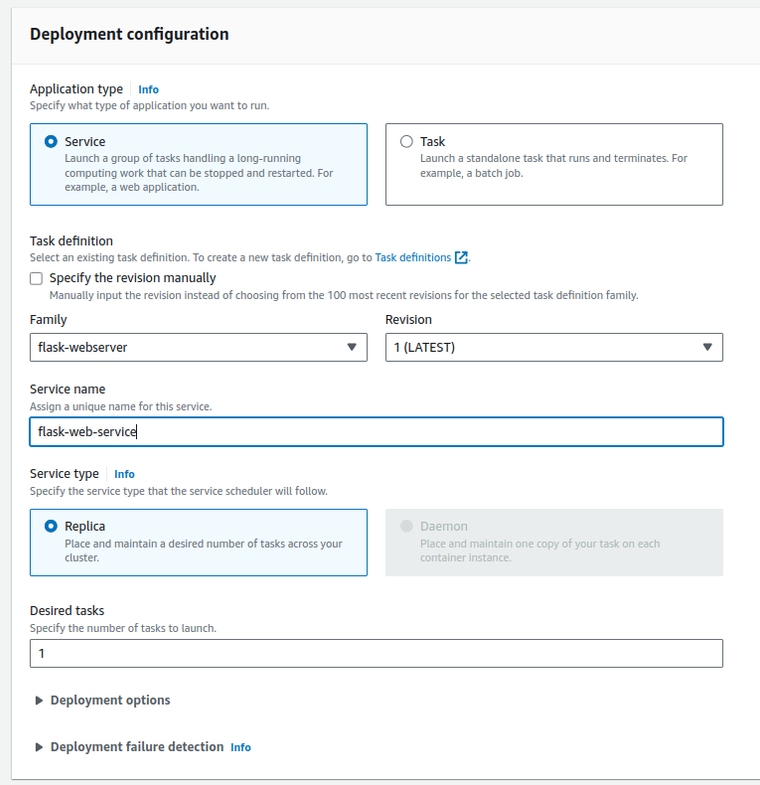
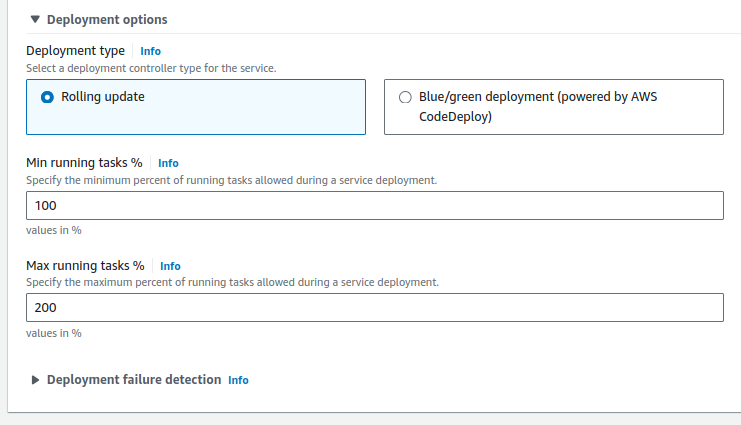
- Configure deployment settings:
- Choose Rolling update for the Deployment type to ensure zero downtime as new tasks are deployed and old ones are terminated.
- Set the minimum and maximum healthy percentages to ensure high availability during deployments.
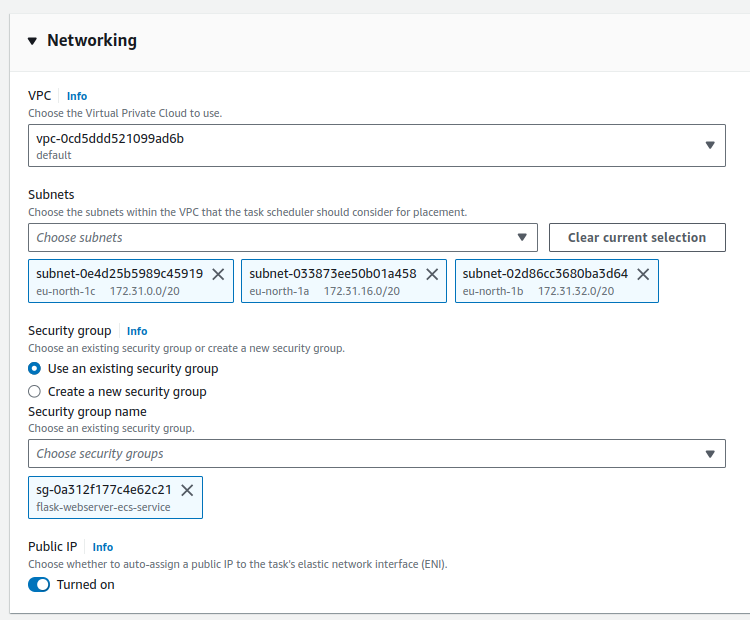
- Networking configuration:
- Under the networking section, choose the VPC and subnets that the service should operate in. Select subnets in different Availability Zones for high availability.
- Assign the security group you created earlier for the ECS service.
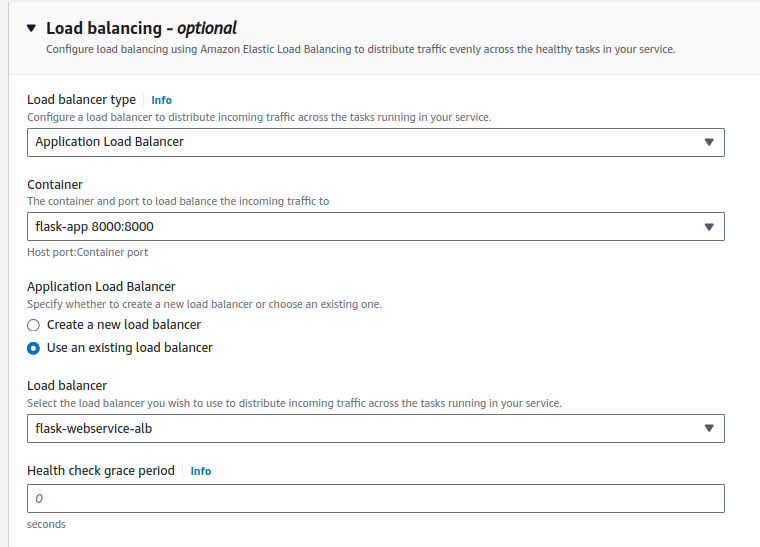
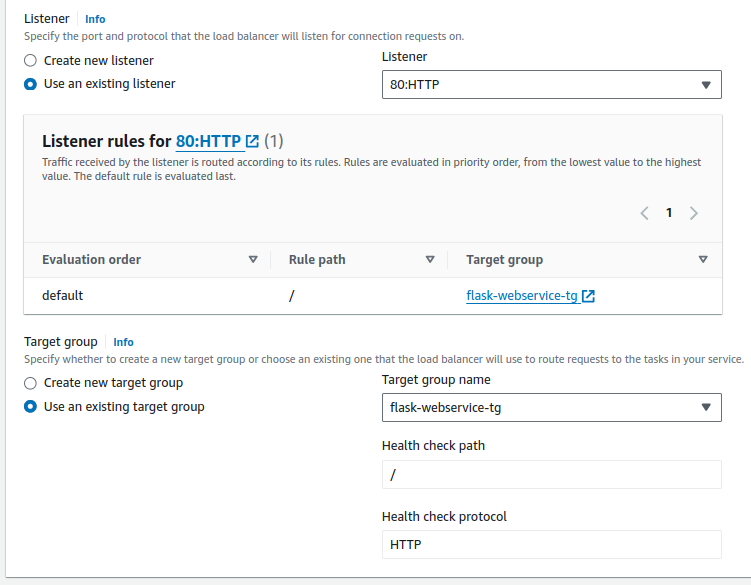
- Load balancer configuration:
- Choose Application Load Balancer and select the appropriate listener (usually HTTP:80 if your application uses HTTP).
- Associate your service with the correct target group that you configured with your ALB.
- Review and create:
- Finally, review all the settings to make sure they are correct. Click on Create Service when you are ready.
- AWS will then launch the specified number of tasks and register them with the load balancer.
Once your service is created, ECS will manage the tasks for you, ensuring they are healthy and meet the desired count. Any defined auto-scaling policies will take effect, scaling the number of tasks up or down based on the criteria you set.
Your Flask application is now deployed on AWS ECS and should be accessible via the DNS name of the ALB.
You should get a Hello World message.
Step 5: Automate Re-deployment with Jenkins Pipeline
Automating deployments with Jenkins ensures consistency and reliability in your release process. To deploy changes using Jenkins pipelines, you need to configure Jenkins to interact with AWS services.
Configure AWS and Jenkins to Run Tasks from the Pipeline
Since we have the credentials of an AWS user stored from the previous step where we configured an ECR repository and its connection with Jenkins, we can just add a policy to the same user and use that user to run the ECS task. However, it is not the best practice to use users at all. Prefer IAM roles over user credentials for EC2-based Jenkins instances for better security and easier credential management.
- Install the Pipeline AWS Steps Plugin:
- Navigate to Manage Jenkins > Manage Plugins in your Jenkins dashboard.
- Search for Pipeline AWS Steps in the Available tab.
- Install the plugin and restart Jenkins if necessary.
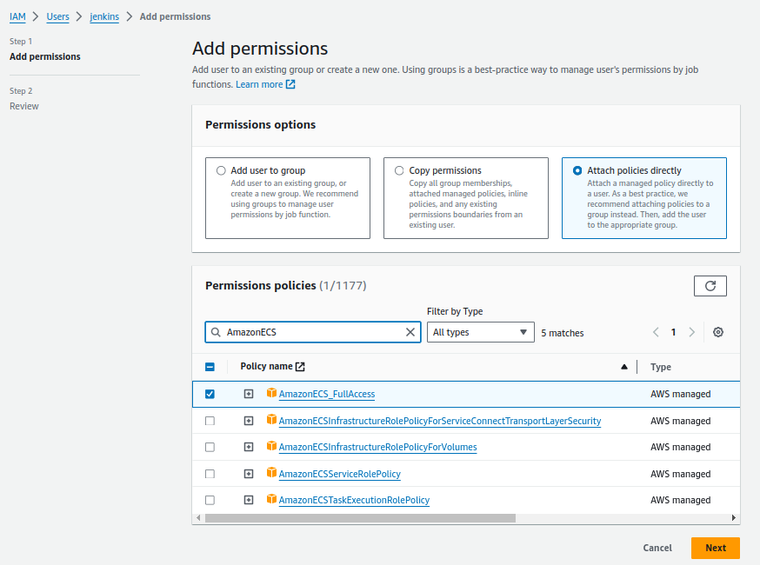
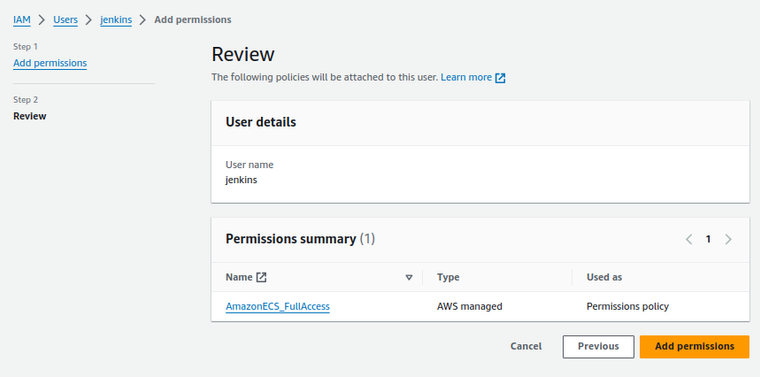
- Assign the necessary AWS policy:
- Go to the IAM section in your AWS Console.
- Attach the
AmazonECS_FullAccesspolicy to the existing Jenkins AWS user or role. This allows the necessary permissions to interact with ECS.
- Install AWS CLI on Jenkins:
- SSH into your Jenkins server.
- Install
unzipif not already installed, with the command appropriate for your Linux distribution. - Run the following commands to download and install the AWS CLI:
curl "https://awscli.amazonaws.com/awscli-exe-linux-x86_64.zip" -o "awscliv2.zip"
unzip awscliv2.zip
sudo ./aws/install
Define the Deployment Pipeline
Set up a Jenkinsfile to define the pipeline that builds, tests, and deploys your Flask application:
- Pipeline environment variables:
- Define environment variables for your Docker repository, AWS credentials, and other necessary information at the start of your
Jenkinsfile.
- Define environment variables for your Docker repository, AWS credentials, and other necessary information at the start of your
- Build docker image stage:
- Build a new Docker image from your application’s source code.
- Test stage:
- Run unit tests inside the built Docker image to ensure stability.
- Upload docker image stage:
- Push the successfully built and tested image to your AWS ECR repository.
- Cleanup docker images stage:
- Remove the built Docker images from the Jenkins server to free up space.
- Deploy to ECS stage: Use the AWS CLI to update the ECS service, which pulls the latest Docker image and re-deploys your application.
pipeline {
    agent any
    environment {
        appRepository = 'flask-app'  // Name of your Docker image repository
        awsID = 'awsID'  // AWS ID
        awsRegion = 'eu-north-1'  // AWS region
        registryCredential = "ecr:$awsRegion:$awsID"  // Authentication to ECR registry
        ecrRegistry = "your-aws-account-id.dkr.ecr.your-region.amazonaws.com" // registry URL
        clusterName = 'my_cluster'
        serviceName = 'flask-web-service'
    }
    stages {
        // omit this stage if you use the pipeline script from SCM
        stage('Fetch code') {
            steps {
                git branch: 'main',
                credentialsId: "gitlab-user-id",
                url: 'https://gitlab.com/your-user-name/your-repository-name.git'
            }
        }
        stage('Build Docker Image') {
            steps {
                script {
                    dockerImage = docker.build(appRepository + ":$BUILD_NUMBER", ".")
                }
            }
        }
        stage('Test') {
            steps {
                script {
                    dockerImage.inside {sh "python -m unittest"}
                }
            }
        }
        stage('Upload Docker Image') {
            steps {
                script {
                    docker.withRegistry('https://' + ecrRegistry, registryCredential) {
                        dockerImage.push("$BUILD_NUMBER")
                        dockerImage.push("latest")
                    }
                }
            }
        }
        stage('Cleanup Docker Images') {
            steps {
                script {
                    sh "docker rmi ${appRepository}:${env.BUILD_NUMBER}"
                    sh "docker rmi ${ecrRegistry}/${appRepository}:${env.BUILD_NUMBER}"
                    sh "docker rmi ${ecrRegistry}/${appRepository}:latest"
                }
            }
        }
        stage('Deploy to ECS') {
            steps {
                withAWS(credentials: awsID, region: awsRegion) {
                    sh 'aws ecs update-service --cluster ${clusterName} --service ${serviceName} --force-new-deployment'
                }
            }
        }
    }
}
Run the Pipeline
Once your Jenkinsfile is configured:
- Use the Jenkins UI to start the pipeline manually, or
- Trigger the pipeline automatically via webhook upon a new commit to your GitLab repository.
Monitor Your Deployment
After initiating the pipeline:
- Watch the progress in the Jenkins console output.
- Once complete, verify the deployment by checking the ECS service status in the AWS Console.
Your Flask application should now be updated and running with the latest changes on AWS ECS.
Step 6: Shut down and Delete (optional)
Shutting down and deleting an Amazon ECS service involves a few steps to ensure that the service is properly removed and that you’re not incurring unnecessary charges for resources you’re no longer using. When you’re ready to decommission your service and remove all the AWS resources that were created for it, you can delete the service through the AWS Management Console, AWS CLI, and CloudFormation (fastest way):
Using the AWS Management Console
- Open the Amazon ECS console:
- Navigate to the Amazon ECS console at https://console.aws.amazon.com/ecs/.
- Select the cluster:
- In the navigation pane, choose Clusters.
- Click the name of the cluster that hosts the service you want to delete.
- Update the service to stop all tasks:
- In the Services tab, select the service you wish to delete.
- Click Update.
- Set the Number of tasks to 0. This action will stop all running tasks associated with the service.
- Scroll down and click Skip to review.
- Review the changes and click Update Service.
- Wait for the service to stop all tasks. This may take a few minutes.
- Delete the service:
- With the service selected, click Delete.
- In the confirmation box, confirm the deletion by clicking Delete.
- Deregister container instances (optional):
- If you’re also planning to shut down and delete the cluster and it’s not being used by any other services, you should deregister any container instances associated with it.
- Go to the ECS Instances tab in the cluster’s details page.
- Select the instances and click Deregister. Confirm the action.
- Delete the cluster (optional):
- If you no longer need the cluster, you can delete it by selecting the cluster from the Clusters page.
- Click Delete Cluster and confirm the deletion.
Using the AWS CLI
- Update the service to stop all tasks:
- To scale down the service to 0 tasks, use the
update-servicecommand:
aws ecs update-service --cluster my_cluster --service flask-web-service --desired-count 0- Replace
my_clusterwith the name of your cluster andflask-web-servicewith the name of your service.
- To scale down the service to 0 tasks, use the
- Wait for the service to scale down:
- You can use the
describe-servicescommand to check the running count of tasks:
aws ecs describe-services --cluster my_cluster --services flask-web-service- Wait until the
"runningCount"is0.
- You can use the
- Delete the service:
- Once all tasks are stopped, you can delete the service:
aws ecs delete-service --cluster my_cluster --service flask-web-service- Confirm that the service is deleted by checking the command’s output.
-
Delete the cluster (optional):
- If you’re also deleting the cluster because it’s no longer needed, use the delete-cluster command:
aws ecs delete-cluster --cluster my_cluster
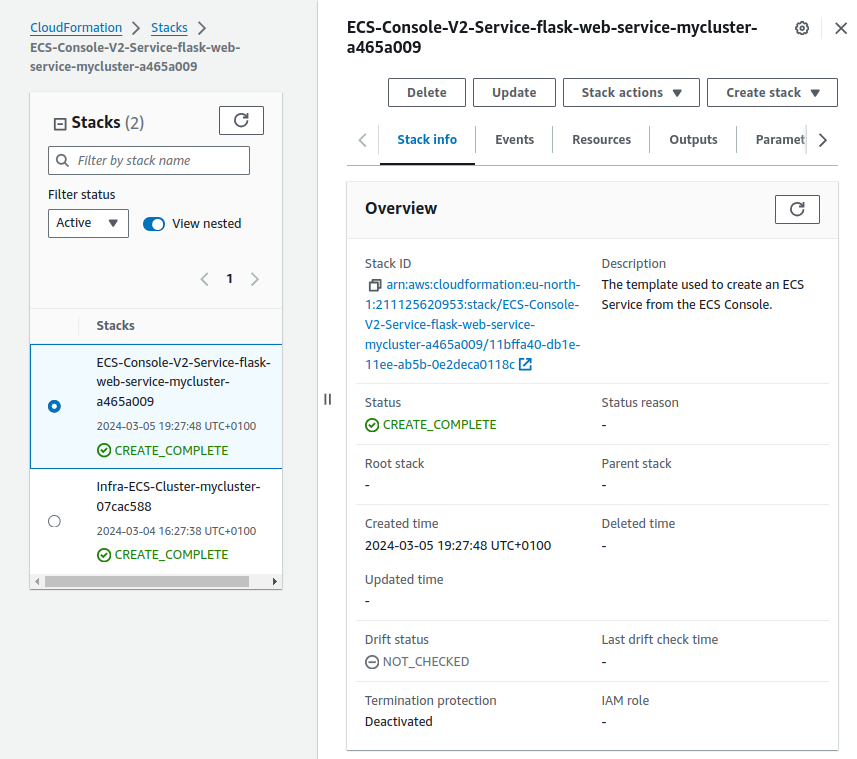
Using CloudFormation
- Access the CloudFormation service from your AWS Management Console.
- In the list of stacks, locate the stack that represents your ECS service, and click on the stack to view its details and ensure it’s the correct one associated with your ECS service.
- Initiate stack deletion:
- From the stack details page, click on the Delete button. This action triggers the deletion of all resources managed by this stack.
- AWS CloudFormation will ask for confirmation before proceeding to ensure you don’t accidentally delete resources.
- Monitor the deletion process:
- After confirmation, CloudFormation will begin the deletion process. You can monitor the progress in the Events tab where CloudFormation logs every action taken.
- Once all resources are successfully deleted, the status of the stack will change to DELETE_COMPLETE.
- Verify resource deletion:
- After the stack’s status changes, verify in the ECS console that the service is no longer running.
- Also, check other related services such as EC2, Load Balancers, and ECR to ensure that all associated resources are removed.
Clean Up
- If there were any resources not managed by CloudFormation or any manually created resources associated with the service, make sure to delete them manually
- Check for any Elastic IPs, snapshots, or volumes that may incur charges if left undeleted.
Following these steps will help you properly shut down and delete an ECS service and, optionally, the ECS cluster if it’s no longer required.
Congratulations on successfully navigating the complexities of deploying a Flask application using AWS ECS with zero downtime! We’ve covered a lot of ground in this guide, from setting up your Jenkins server on an EC2 instance to pushing your Docker images to ECR, and finally, orchestrating a seamless deployment on ECS using an application load balancer.